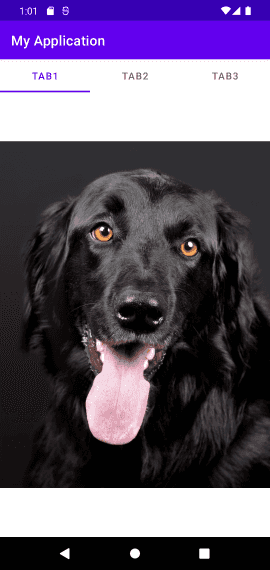
TabLayoutは、下の画像のようにTabを押したときにそれぞれ異なるページを表示するレイアウトです。上部にTabボタンが表示され、このボタンを押すと中央のページが変更されます。
TabLayoutとViewPager2を使用すると、Tabを押したときに他のページが表示する機能を簡単に実装できます。 ViewPager2 は Swipe でページをめくる UI を実装するために使用されるクラスで、既存にあった ViewPager の改善されたバージョンです。例を通して詳しく学びましょう。
この記事で紹介する例は、GitHub - TabLayoutExampleにアップロードしました。説明が不足している部分は完全なコードを参照してください。
1. 依存性の追加
ViewPager2とTabLayoutを使用するために、gradleに次のように依存関係を追加します。
dependencies {
    ...

    implementation 'com.google.android.material:material:1.4.0'
}
2. Layoutの設定
まず、メインプロジェクトを作成し、MainActivityのlayoutである activity_main.xmlを次のように変更します。
<?xml version="1.0" encoding="utf-8"?>
<LinearLayout xmlns:android="http://schemas.android.com/apk/res/android"
    xmlns:app="http://schemas.android.com/apk/res-auto"
    xmlns:tools="http://schemas.android.com/tools"
    android:layout_width="match_parent"
    android:layout_height="match_parent"
    android:orientation="vertical"
    tools:context=".MainActivity">

    <com.google.android.material.tabs.TabLayout
        android:id="@+id/tabLayout"
        android:layout_width="match_parent"
        android:layout_height="wrap_content" />

    <androidx.viewpager2.widget.ViewPager2
        android:id="@+id/viewPager"
        android:layout_width="match_parent"
        android:layout_height="0dp"
        android:layout_weight="1" />

</LinearLayout>- 簡単な説明のためにLinearLayoutに変わります
- TabLayoutとViewPager2を追加
3. Fragmentの追加
Tabを押したときに表示される画面はFragmentで実装されます。 3つのTabを追加するので、3つのFragmentを準備する必要があります。
Tab1Fragment.javaという名前で以下のように実装しました。
package com.example.myapplication

import android.os.Bundle
import android.view.LayoutInflater
import android.view.View
import android.view.ViewGroup
import androidx.fragment.app.Fragment
import com.example.myapplication.databinding.Tab1FragmentBinding

class Tab1Fragment : Fragment() {
    private lateinit var binding: Tab1FragmentBinding

    override fun onCreateView(
        inflater: LayoutInflater,
        container: ViewGroup?,
        savedInstanceState: Bundle?
    ): View? {
        binding = Tab1FragmentBinding.inflate(inflater, container, false)
        return binding.root
    }
}
layout ファイル tab_1_fragment.xml は次のように実装します。
<?xml version="1.0" encoding="utf-8"?>
<androidx.constraintlayout.widget.ConstraintLayout xmlns:android="http://schemas.android.com/apk/res/android"
    xmlns:app="http://schemas.android.com/apk/res-auto"
    xmlns:tools="http://schemas.android.com/tools"
    android:layout_width="match_parent"
    android:layout_height="match_parent"
    tools:context=".Tab1Fragment">

    <ImageView
        android:id="@+id/imageViewCat"
        android:layout_width="wrap_content"
        android:layout_height="wrap_content"
        android:src="@drawable/dog1"
        app:layout_constraintBottom_toBottomOf="parent"
        app:layout_constraintEnd_toEndOf="parent"
        app:layout_constraintHorizontal_bias="0.5"
        app:layout_constraintStart_toStartOf="parent"
        app:layout_constraintTop_toTopOf="parent" />

</androidx.constraintlayout.widget.ConstraintLayout>- Tab2、Tab3のファイルも上記のようにしてください。
- View Bindingを使用してkotlinでlayoutで宣言されたオブジェクトにアクセスしました
- 各Fragmentは単に1つの画像を示しています
ちなみに、View Bindingを使用するには、App gradleで次のように設定する必要があります。
android {
    buildFeatures {
        viewBinding = true
    }
4. ViewPager Adapterの実装
FragmentStateAdapterを継承するViewPager Adapterを次のように実装しました。 Adapterには、Tab全体の数と、どのTabを押したときにどのFragmentが生成されるべきかについての具体的な内容が実装されています。
package com.example.myapplication

import androidx.fragment.app.Fragment
import androidx.fragment.app.FragmentManager
import androidx.lifecycle.Lifecycle
import androidx.viewpager2.adapter.FragmentStateAdapter

private const val NUM_TABS = 3

class ViewPagerAdapter(fragmentManager: FragmentManager, lifecycle: Lifecycle) :
        FragmentStateAdapter(fragmentManager, lifecycle) {

    override fun getItemCount(): Int {
        return NUM_TABS
    }

    override fun createFragment(position: Int): Fragment {
        when (position) {
            0 -> return Tab1Fragment()
            1 -> return Tab2Fragment()
            2 -> return Tab3Fragment()
        }
        return Tab3Fragment()
    }
}
5. TabLayoutの実装
MainActivityにはTabLayoutとViewPager2を連動させる実装があります。
package com.example.myapplication

import android.os.Bundle
import androidx.appcompat.app.AppCompatActivity
import com.example.myapplication.databinding.ActivityMainBinding
import com.google.android.material.tabs.TabLayoutMediator

class MainActivity : AppCompatActivity() {

    private lateinit var binding: ActivityMainBinding
    private val tabTitleArray = arrayOf(
        "Tab1",
        "Tab2",
        "Tab3"
    )

    override fun onCreate(savedInstanceState: Bundle?) {
        super.onCreate(savedInstanceState)
        binding = ActivityMainBinding.inflate(layoutInflater)
        setContentView(binding.root)

        val viewPager = binding.viewPager
        val tabLayout = binding.tabLayout

        viewPager.adapter = ViewPagerAdapter(supportFragmentManager, lifecycle)

        TabLayoutMediator(tabLayout, viewPager) { tab, position ->
            tab.text = tabTitleArray[position]
        }.attach()
    }

}- View Bindingを使用してTabLayoutとViewPager2オブジェクトにアクセスする
- ViewPagerに上記で作成したアダプタを設定します
- TabLayoutMediator は TabLayout と ViewPager2 を連動させるのに役立つオブジェクトです。上記のように引数で TabLayout と ViewPager2 オブジェクトを渡して
attach()を呼び出すと連動になります。実装されたインタフェースは、Tabを押したときに選択されたTabのtitleを設定するコードです。
GitHub - TabLayoutExampleでサンプルプロジェクトを確認できます。画像ファイルや詳細コードを確認できます。
6. Scrollable
Tabが多いと、Tabのタイトルが見えにくくなることがあります。この場合、TabLayoutをScrollableに設定すると、次のように一部のTabが表示され、Tab位置からSwipeすると他のTabが表示されます。
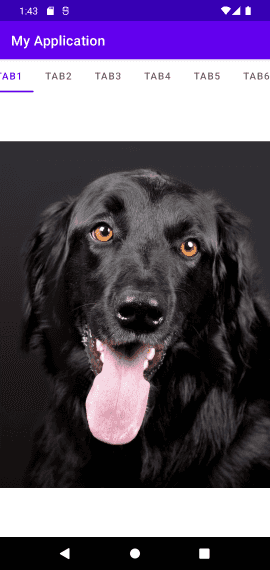
Scrollableに設定するには、次のようにTabLayoutで tabModeを scrollableに設定するだけです。 (デフォルトは fixedで、上記の例のようにTabが固定されています。)
<com.google.android.material.tabs.TabLayout
android:id="@+id/tabLayout"
android:layout_width="match_parent"
android:layout_height="wrap_content"
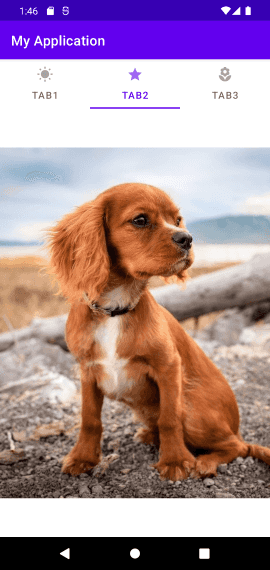
app:tabMode="scrollable"/>7. TabにIconを追加
次のようにタブにアイコンを追加することもできます。
 '
'
Icon を追加する方法は TabLayoutMediator を実装するとき、Tab の Icon 設定も一緒に実装してください。
private val tabTitleArray = arrayOf(
    "Tab1",
    "Tab2",
    "Tab3"
)
private val tabIconArray = arrayOf(
    R.drawable.ic_sunny,
    R.drawable.ic_star,
    R.drawable.ic_florist
)

TabLayoutMediator(tabLayout, viewPager) { tab, position ->
    tab.text = tabTitleArray[position]
    tab.icon = getDrawable(tabIconArray[position])
}.attach()
8. まとめ
ViewPager2でTabLayoutを実装する方法を簡単に調べました。サンプルプロジェクトはGitHub - TabLayoutExampleにアップロードしましたが、わからない部分がある場合はコードを確認してください。
Related Posts
- Android - FusedLocationProviderClientに位置情報を取得する
- Android - GPS、Network位置情報を取得する(LocationManager)
- Android - adbコマンドでActivity実行
- アンドロイド - MediaStoreにメディアファイルを保存する方法
- Android - Runtime permissionリクエスト方法と例(kotlin)
- Android11 - Storage(ストレージ)の変更まとめ
- Jetpack Compose - RowとColumn
- Android 13 - 細かいメディアファイルの権限
- Android 13でNotification権限をリクエスト、通知を表示する
- エラー解決:android gradle plugin requires java 11 to run. you are currently using java 1.8.
- Query method parameters should either be a type that can be converted into a database column or a List
- Android - TabLayoutの実装方法(+ ViewPager2)
- Android - adbコマンドで特定のパッケージのプロセスの終了
- Android - adb push、pullでファイルのコピー、ダウンロード
- Android - adbコマンドでsettings value確認、変更、
- Android 12 - IntentFilterのexported明示的な宣言
- Android - adb logcatコマンドでログ出力
- Android - ACTION_BOOT_COMPLETEDイベント受信
- Android - Foreground Service実行
- Android - ファイル入出力の例(Read、Write、内部、外部ストレージ)
- Android - アプリの権限を確認(Permission check)
- Android - adbで実行中のプロセス、スレッドリスト及びメモリ情報の確認
- Android - Broadcast Receiver登録およびイベントの受信方法
- Android - Cleartext HTTP ... not permitted例外解決方法
- Androidのビルドエラー - Calls to Java default methods are prohibited in JVM target 1.6
- アンドロイド - Assetsでファイルを読み取る方法
- アンドロイドのさまざまなNotification種類と実装方法
- アンドロイド - INSTALL_FAILED_TEST_ONLYエラー解決方法
- Android EspressoのCustom Matcher実装方法
- Android Espressoを使用してUIをテストする方法(3)
- アンドロイド - CTS hostsideをgradleで構築する方法
- Androidのアプリのデータフォルダーのパスと内部/外部ストレージ説明
- アンドロイド - 最初のApp作成
- Androidをインストールする方法(Windows)