Andorid 7.1(API 25)에 App Shortcut 기능이 소개되었습니다. App Shortcut은 Launcher에서 앱의 아이콘을 길게 눌렀을 때 미리 설정한 액티비티로 바로 이동하거나, 특정 인텐트를 실행하는 Shorutcut 아이콘을 보여주는 기능입니다.
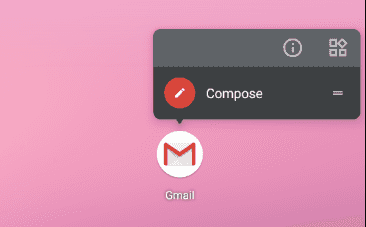
Gmail을 예로 들면, 아래 그림과 같이 아이콘을 길게 눌렀을 때 "Compose"라는 Shortcut이 보입니다. 이것을 누르면 바로 이메일을 작성할 수 있는 페이지로 이동하도록 구현되었습니다.
이 글에서 사용된 예제는 GitHub - AppShortcuts에서 확인할 수 있습니다.
Shortcut의 종류
안드로이드는 다음과 같은 종류의 Shortcut을 제공합니다.
- Static shortcuts
- Dynamic shortcuts
- Pinned shortcuts
Static shortcuts
App의 Manifest에 정의하는 Shortcut을 Static Shortcut이라고 합니다. 앱 빌드 시점에 Shortcut이 정해지기 때문에 Runtime에 변경할 수 없습니다.
아이콘을 길게 누르면 Static shotcuts을 보여줍니다.
Dynamic shortcuts
ShortcutManager API를 이용하여 동적으로 추가, 삭제가 가능한 Shortcut을 Dynamic Shortcut이라고 합니다. Dynamic shortcut도 Static shortcut과 똑같이 생겼습니다. 다만 Runtime에 추가, 삭제가 가능하다는 것이 차이점입니다.
Pinned shortcuts
Static과 Dynamic은 앱의 아이콘을 길게 눌렀을 때 보이는 Shortcut입니다. Pinned Shortcut은 이 둘과 다르게, App 아이콘처럼 Launcher에 등록되는 Shortcut입니다.
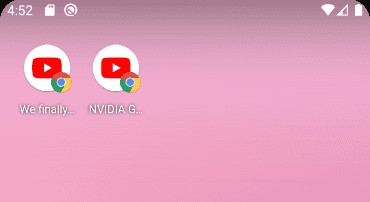
다음은 Youtube 앱이 Launcher에 등록한 Pinned Shortcut의 모습입니다. App의 아이콘과 분리되어 독립적으로 보여집니다.
Static Shortcuts 구현
Static shortcuts는 다음과 같이 App의 Manifest에 정의합니다. Launcher에 보여지는 Activity에 android.app.shortcuts라는 metadata를 추가합니다.
그리고 @xml/shortcuts라는 xml파일에 Shortcut에 대한 내용을 정의하면 됩니다.
<activity android:name=".MainActivity">
    <intent-filter>
        <action android:name="android.intent.action.MAIN" />
        <category android:name="android.intent.category.LAUNCHER" />
    </intent-filter>
    <meta-data android:name="android.app.shortcuts"
        android:resource="@xml/shortcuts" />
</activity>
아래 코드는 /res/xml/shortcuts.xml에 구현한 내용입니다.
<shortcuts> 안에 등록하고 싶은 개수 만큼 <shortcut>을 정의하면 됩니다.
<shortcuts xmlns:android="http://schemas.android.com/apk/res/android">
    <shortcut
        android:shortcutId="email"
        android:enabled="true"
        android:icon="@drawable/add"
        android:shortcutShortLabel="@string/add_shortcut_short_label"
        android:shortcutLongLabel="@string/add_shortcut_long_label"
        android:shortcutDisabledMessage="@string/add_shortcut_disabled_message">
        <intent
            android:action="com.example.appshortcuts.ADD_WEBSITE"
            android:targetPackage="com.example.appshortcuts"
            android:targetClass="com.example.appshortcuts.AddWebActivity" />
    </shortcut>
</shortcuts><shortcut>의 속성의 의미는 다음과 같습니다.
- shortcutId: Shortcut의 고유한 ID입니다. Shrotcut을 등록하거나 찾을 때 이 ID를 사용합니다.
- enabled: 이 값이 true라면 Shortcut 아이콘을 눌렀을 때 어떤 기능이 동작합니다. false라면 실행이 안되고 shortcutDisabledMessage에 설정한 메시지가 Toast로 보여집니다.
- icon: Shortcut의 Icon입니다.
- shortcutShortLabel: Shortcut의 Label입니다. 가능하면 10자 내외로 작성해주세요.
- shortcutLongLabel: Shortcut의 Label입니다. 가능하면 25자 내외로 작성해주세요.
- shortcutDisabledMessage: 비활성화된 Shortcut을 실행시킬 때 이 메시지를 보여줍니다. 따라서, 이 Shortcut은 비활성화 되었고, 사용이 불가능하다는 것을 사용자에게 알려줄 수 있는 메시지면 좋습니다.
- intent: Shortcut 아이콘을 눌렀을 때 실행되는 인텐트입니다. 내 앱의 Activity를 실행시킬 수 있고, 또는 다른 앱을 실행시킬 수 있습니다.
동작 확인
이제 앱을 빌드하고 디바이스에 설치해보세요.
다음과 같이 앱 아이콘을 길게 누르면 Static shortcut이 보입니다. Shortcut을 눌러보시면 위에서 설정한 AddWebActivity가 실행됩니다.

Dynamic Shortcuts 등록
ShortcutManager를 통해 Dynamic Shortcut을 등록할 수 있습니다.
먼저 ShortcutInfo.Builder()로 ShortcutInfo를 생성합니다.
여기서 설정하는 Label 등과 같은 속성들은 위에서 Static Shortcut을 만들 떄 소개한 것과 속성들과 동일합니다.
마지막으로 ShortcutManager.setDynamicShortcuts()에 리스트로 전달된 모든 ShortcutInfo들이 Dynamic Shortcut으로 등록됩니다.
val context = applicationContext
val shortcutManager = getSystemService<ShortcutManager>(ShortcutManager::class.java)
val shortcut = ShortcutInfo.Builder(context, "shortcutId1")
        .setShortLabel("Website")
        .setLongLabel("Open the website")
        .setDisabledMessage("This shortcut is disabled")
        .setIcon(Icon.createWithResource(context, R.drawable.link))
        .setIntent(Intent(Intent.ACTION_VIEW,
                Uri.parse("https://www.mysite.example.com/")))
        .build()

shortcutManager.setDynamicShortcuts(listOf(shortcut))
위의 코드를 실행시키면, shortcutId1라는 ID로 Shortcut이 등록됩니다.
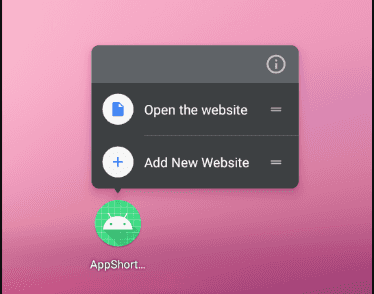
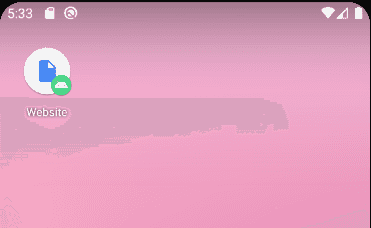
그리고 다음과 같이 앱 아이콘을 길게 눌러보면 Dynamic Shortcut이 추가된 것을 확인할 수 있습니다.
Dynamic Shortcut 삭제
ShortcutManager.removeDynamicShortcuts()으로 등록된 Shortcut ID를 리스트로 전달하면, 전달된 모든 ID에 해당하는 Shortcut들이 삭제됩니다.
모든 Shortcut을 삭제하고 싶다면 removeAllDynamicShortcuts()을 사용할 수도 있습니다.
val context = applicationContext
val shortcutManager = getSystemService<ShortcutManager>(ShortcutManager::class.java)
shortcutManager.removeDynamicShortcuts(listOf("shortcutId1"))
// shortcutManager.removeAllDynamicShortcuts()
Shortcut 업데이트
이미 등록된 Shortcut의 ID를 알고 있다면, Shortcut의 정보를 변경할 수 있습니다. 변경이 가능한 Shortcut은 Pinned Shortcut과 Dyanmic Shortcut입니다.
다음은 shortcutId1으로 등록된 Shorcut의 Label을 변경하는 코드입니다.
val context = applicationContext
val shortcutManager = getSystemService<ShortcutManager>(ShortcutManager::class.java)
val shortcut = ShortcutInfo.Builder(context, "shortcutId1")
        .setShortLabel("Website!")
        .setLongLabel("Open! the website")
        .setDisabledMessage("This shortcut is disabled")
        .setIcon(Icon.createWithResource(context, R.drawable.link))
        .setIntent(Intent(Intent.ACTION_VIEW,
                Uri.parse("https://www.mysite.example.com/")))
        .build()

shortcutManager.updateShortcuts(listOf(shortcut))
위 코드를 실행하고 Launcher에서 Dynamic shortcut을 확인하면 Label이 변경된 것을 확인할 수 있습니다.
Pinned Shortcuts 등록
Pinned Shortcuts을 등록하는 것도 Dynamic Shortcut과 비슷합니다. ShortcutInfo를 만드는 방법은 동일하고, 등록하는 방법이 조금 다릅니다.
Dynamic shortcut은 App에 등록하는 Shortcut이고, Pinned Shortcut은 Launcher에 등록하는 Shortcut인데요.
그렇게 때문에 Pinned Shortcut을 등록할 때, Launcher가 Pinned shortcut을 지원하는지 ShortcutManager.isRequestPinShortcutSupported() API로 확인해야 합니다.
true를 리턴한다면 지원한다는 의미입니다.
ShortcutManager.requestPinShortcut()으로 Shortcut을 등록하면 되는데, 추가로 IntentSender를 인자로 전달해야 합니다.
이 API를 호출하면 팝업을 띄워 사용자에게 Launcher에 등록할 것인지 물어보는데요, 이런 결과를 수신하고 처리하기 위해 IntentSender가 필요합니다.
다음과 같이 구현하면 Pinned Shortcut을 등록할 수 있습니다.
val context = applicationContext
val shortcut = ShortcutInfo.Builder(context, "pinnedShortcutId1")
        .setShortLabel("Website")
        .setLongLabel("Open the website")
        .setDisabledMessage("This shortcut is disabled")
        .setIcon(Icon.createWithResource(context, R.drawable.link))
        .setIntent(Intent(Intent.ACTION_VIEW,
                Uri.parse("https://www.mysite.example.com/")))
        .build()

val shortcutManager = getSystemService<ShortcutManager>(ShortcutManager::class.java)
if (shortcutManager.isRequestPinShortcutSupported) {
    val pinnedShortcutCallbackIntent =
            shortcutManager.createShortcutResultIntent(shortcut)

    val successCallback = PendingIntent.getBroadcast(context, /* request code */ 0,
            pinnedShortcutCallbackIntent, /* flags */ 0)

    shortcutManager.requestPinShortcut(shortcut, successCallback.intentSender)
}
위 코드를 실행해보면, 다음과 같은 팝업이 뜹니다.
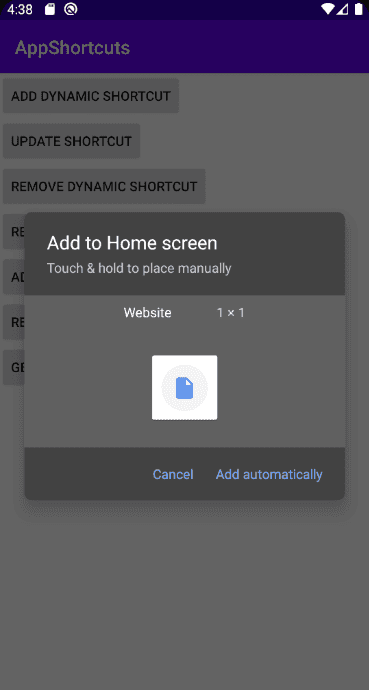
Add 버튼을 누르면 다음과 같이 Launcher에 Shortcut이 추가됩니다.
Shortcut 비활성화
Dynamic shortcut의 경우 내 앱에 등록한 것이기 때문에 삭제가 가능하지만, Pinned Shortcut은 Launcher에 등록된 Shortcut이기 때문에 앱에서 직접 삭제할 수 없습니다. 어떤 이유로 Shortcut이 동작되지 않고, 그래서 사용자가 Shortcut을 사용하지 못하게 하려면 disable하는 방법이 있습니다.
다음과 같이 ShortcutManager.disableShortcuts()에 Shortcut ID를 리스트로 전달하면 그 Shortcut들이 비활성화됩니다.
다시 enable로 변경하려는 경우 enableShortcuts() API를 사용하시면 됩니다.
val context = applicationContext
val shortcutManager = getSystemService<ShortcutManager>(ShortcutManager::class.java)
shortcutManager.disableShortcuts(listOf("pinnedShortcutId1"))
// shortcutManager.enableShortcuts(listOf("pinnedShortcutId1"))
ShortcutInfo 가져오기
다음 API를 사용하면 각각의 ShortcutInfo를 가져올 수 있습니다.
- getManifestShortcuts()
- getDynamicShortcuts()
- getPinnedShortcuts()
SDK API 30 이상에서는 ShortcutManager.getShortcuts() API를 제공하며 다음과 같은 플래그를 인자로 전달하여 원하는 Shortcut의 정보를 얻을 수 있습니다.
FLAG_MATCH_MANIFESTFLAG_MATCH_DYNAMICFLAG_MATCH_PINNED
다음은 위의 API를 이용하여 ShortcutInfo를 가져와 로그로 출력하는 예제입니다.
val context = applicationContext
val shortcutManager = getSystemService<ShortcutManager>(ShortcutManager::class.java)

// Static shortcuts
val manifestShortcuts: List<ShortcutInfo> = if (Build.VERSION.SDK_INT >= Build.VERSION_CODES.R) {
    shortcutManager.getShortcuts(ShortcutManager.FLAG_MATCH_MANIFEST)
} else {
    shortcutManager.getManifestShortcuts()
}
for (shortcut:ShortcutInfo in manifestShortcuts) {
    Log.d(TAG, "Manifest ShortcutInfo: $shortcut")
}

// Dynamic shortcuts
val dynamicShortcuts = if (Build.VERSION.SDK_INT >= Build.VERSION_CODES.R) {
    shortcutManager.getShortcuts(ShortcutManager.FLAG_MATCH_DYNAMIC)
} else {
    shortcutManager.getDynamicShortcuts()
}
for (shortcut:ShortcutInfo in dynamicShortcuts) {
    Log.d(TAG, "Dynamic ShortcutInfo: $shortcut")
}

// Pinned shortcuts
val pinnedShortcuts = if (Build.VERSION.SDK_INT >= Build.VERSION_CODES.R) {
    shortcutManager.getShortcuts(ShortcutManager.FLAG_MATCH_PINNED)
} else {
    shortcutManager.getPinnedShortcuts()
}
for (shortcut:ShortcutInfo in pinnedShortcuts) {
    Log.d(TAG, "Pinned ShortcutInfo: $shortcut")
}
참고
이 글에서 사용된 예제는 GitHub - AppShortcuts에서 확인할 수 있습니다.
Related Posts
- Android 14 - 사진/동영상 파일, 일부 접근 권한 소개
- Android - adb push, pull로 파일 복사, 다운로드
- Android 14 - 암시적 인텐트 변경사항 및 문제 해결
- Jetpack Compose - Row와 Column
- Android 13, AOSP 오픈소스 다운로드 및 빌드
- Android 13 - 세분화된 미디어 파일 권한
- Android 13에서 Notification 권한 요청, 알림 띄우기
- Android 13에서 'Access blocked: ComponentInfo' 에러 해결
- 에러 해결: android gradle plugin requires java 11 to run. you are currently using java 1.8.
- 안드로이드 - 코루틴과 Retrofit으로 비동기 통신 예제
- 안드로이드 - 코루틴으로 URL 이미지 불러오기
- Android - 진동, Vibrator, VibrationEffect 예제
- Some problems were found with the configuration of task 에러 수정
- Query method parameters should either be a type that can be converted into a database column or a List
- 우분투에서 Android 12 오픈소스 다운로드 및 빌드
- Android - ViewModel을 생성하는 방법
- Android - Transformations.map(), switchMap() 차이점
- Android - Transformations.distinctUntilChanged() 소개
- Android - TabLayout 구현 방법 (+ ViewPager2)
- Android - 휴대폰 전화번호 가져오는 방법
- Android 12 - Splash Screens 알아보기
- Android 12 - Incremental Install (Play as you Download) 소개
- Android - adb 명령어로 bugreport 로그 파일 추출
- Android - adb 명령어로 App 데이터 삭제
- Android - adb 명령어로 앱 비활성화, 활성화
- Android - adb 명령어로 특정 패키지의 PID 찾기
- Android - adb 명령어로 퍼미션 Grant 또는 Revoke
- Android - adb 명령어로 apk 설치, 삭제
- Android - adb 명령어로 특정 패키지의 프로세스 종료
- Android - adb 명령어로 screen capture 저장
- Android - adb 명령어로 System 앱 삭제, 설치
- Android - adb 명령어로 settings value 확인, 변경
- Android 12 - IntentFilter의 exported 명시적 선언
- Android - adb 명령어로 공장초기화(Factory reset)
- Android - adb logcat 명령어로 로그 출력