Jetpack Compose에서 Row와 Column을 이용하여 UI의 레이아웃을 설정하는 방법과 예제를 소개합니다.
튜토리얼에서 사용되는 코드는 글 하단에 링크가 있습니다.
1. Row와 Column
Jetpack Compose에서 Row와 Column은 기존 안드로이드 레이아웃의 LinearLayout과 비슷합니다.
- Row : 가로 방향으로 View를 배치
- Column : 세로 방향으로 View를 배치
2. Row
Row를 사용하여 레이아웃을 변경하기 전에, 예제에서는 아래와 같이 Activity가 구현되어있습니다.
MainUI() 함수에 UI를 구현하면, 구현된 내용이 Preview와 앱 화면에 보여집니다.
class MainActivity : ComponentActivity() {
    override fun onCreate(savedInstanceState: Bundle?) {
        super.onCreate(savedInstanceState)
        setContent {
            TutorialsTheme {
                MainUI()
            }
        }
    }
}

@Composable
fun MainUI() {
    // UI Implementations...
}

@Preview(showSystemUi = true, showBackground = true)
@Composable
fun DefaultPreview() {
    TutorialsTheme {
        MainUI()
    }
}
이제 Row를 이용하여 레이아웃을 변경해보겠습니다.
Row는 Row 하위에 있는 UI 요소들을 가로 방향으로 배치합니다.
@Composable
fun MainUI() {
    SimpleRow()
}

@Composable
fun SimpleRow() {
    Row() {
        Text(text = "Row 1", Modifier.background(Color.Red))
        Text(text = "Row 2", Modifier.background(Color.Green))
        Text(text = "Row 3", Modifier.background(Color.Blue))
    }
}
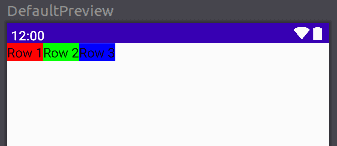
위 예제의 Preview를 확인해보면 아래와 같이 Row의 하위 UI 요소들이 가로로 배치됩니다.
- Row에 Modifier를 설정하지 않았기 때문에, 기본적으로 3개의 Text가 왼쪽에 붙어서 배치되었음
- Text를 구분하기 위해 Text의 background color를 설정
2.1 Alignment, Arrangement
Row의 modifier를 추가하여 하위 요소들의 위치를 변경할 수도 있습니다.
- modifier로 background color를 Gray로 변경하여 Row가 화면에서 차지하는 영역을 확인
- verticalAlignment : 세로 축에서 요소들의 위치 설정 (TOP / CenterVertically / Bottom)
- horizontalArrangement : 가로 축에서 요소들의 배치 방법 설정 (SpaceEvenly / SpaceBetween / SpaceAround)
@Composable
fun SimpleRow() {
    Row(
        modifier = Modifier.fillMaxWidth().background(Color.Gray)
        verticalAlignment = Alignment.CenterVertically,
        horizontalArrangement = Arrangement.SpaceEvenly
    ) {
        Text(text = "Row 1", Modifier.background(Color.Red))
        Text(text = "Row 2", Modifier.background(Color.Green))
        Text(text = "Row 3", Modifier.background(Color.Blue))
    }
}
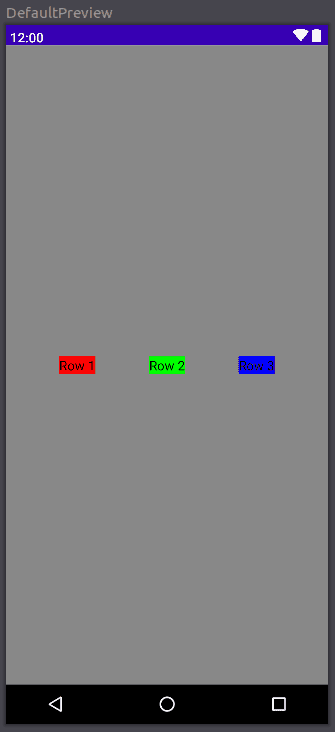
위 예제의 Preview를 확인하면 아래와 같이 세로축에서 가운데에(CenterVertically) 요소들이 위치하고, 가로축에서는 균등한 폭으로(SpaceEvenly) 배치됩니다.
2.2 Arrangement 속성
- SpaceEvenly : 양쪽 끝과 요소들의 간격을 모두 동일하게 설정
- SpaceBetween : 양쪽 끝과 요소의 간격은 0dp로, 요소들 간의 간격은 동일하게 설정
- SpaceAround : 요소들 간의 간격은 균등하게, 양쪽 끝과 요소의 간격은 요소 간의 간격의 1/2로 설정
2.3 Vertical Alignment 속성
- TOP : 세로 축에서 요소를 위쪽에 배치
- CenterVertically : 세로 축에서 요소를 가운데 배치
- Bottom : 세로 축에서 요소를 아래쪽에 배치
3. Column
Column은 Column 하위에 있는 UI 요소들을 세로 방향으로 배치합니다.
아래 예제에서 Column 하위에 3개의 Text 요소가 있습니다.
@Composable
fun MainUI() {
    SimpleColumn()
}

@Composable
fun SimpleColumn(){
    Column() {
        Text(text = "Column 1", Modifier.background(Color.Red))
        Text(text = "Column 2", Modifier.background(Color.Green))
        Text(text = "Column 3", Modifier.background(Color.Blue))
    }
}
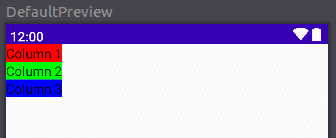
위 예제의 Preview를 확인하면 아래와 같이 Text가 세로 방향으로 배치됩니다.
- Column에 Modifier를 설정하지 않았기 때문에 기본적으로 3개의 Text가 붙어서 배치됨
- Text를 구분하기 위해 Text의 background color를 설정
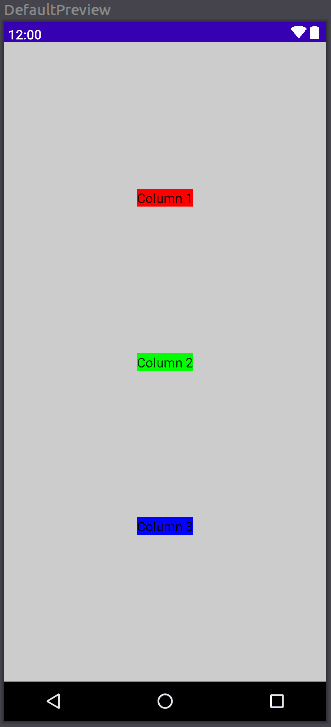
3.1 Alignment, Arrangement
Column의 modifier를 추가하여 하위 요소들의 위치를 변경할 수도 있습니다.
- modifier로 background color를 LightGray로 변경하여 Column가 화면에서 차지하는 영역을 확인
- verticalArrangement : 세로 축에서 요소들의 배치 방법 설정 (SpaceEvenly / SpaceBetween / SpaceAround)
- horizontalAlignment : 가로 축에서 요소들의 위치 설정 (Start / CenterHorizontally / End)
@Composable
fun ArrangedColumn() {
    Column (
        modifier = Modifier.fillMaxWidth().fillMaxHeight().background(Color.LightGray),
        verticalArrangement = Arrangement.SpaceEvenly,
        horizontalAlignment = Alignment.CenterHorizontally)
    {
        Text(text = "Column 1", Modifier.background(Color.Red))
        Text(text = "Column 2", Modifier.background(Color.Green))
        Text(text = "Column 3", Modifier.background(Color.Blue))
    }
}
3.2 Arrangement 속성
- SpaceEvenly : 양쪽 끝과 요소들의 간격을 모두 동일하게 설정
- SpaceBetween : 양쪽 끝과 요소의 간격은 0dp로, 요소들 간의 간격은 동일하게 설정
- SpaceAround : 요소들 간의 간격은 균등하게, 양쪽 끝과 요소의 간격은 요소 간의 간격의 1/2로 설정
3.3 Horizontal Alignment 속성
- Start : 가로 축에서 요소를 왼쪽에 배치
- CenterHorizontally : 가로 축에서 요소를 가운데 배치
- End : 가로 축에서 요소를 오른쪽에 배치
4. Column과 Row를 함께 사용
아래 예제는 Column과 Row를 함께 사용하는 예제입니다.
예제를 보시면 Column { .. } 하위에 위에서 구현한 Row와 Column 함수가 있습니다.
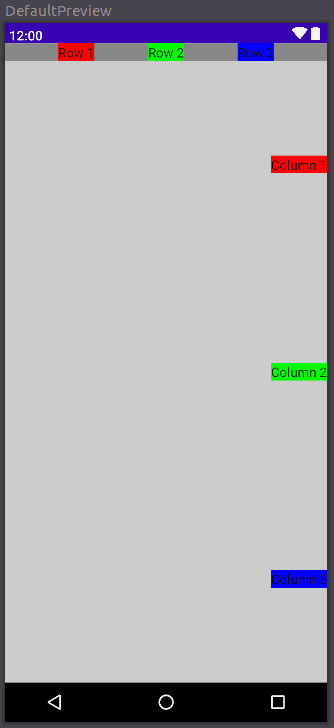
실행 결과를 예상해보면, 첫번째 열에 ArrangedRow()에서 정의한 Row가 배치될 것이고, 두번째 열에 ArrangedColumn()에서 정의한 Column가 배치될 것입니다.
@Composable
fun MainUI() {
    Column {
        ArrangedRow()
        ArrangedColumn()
    }
}

@Composable
fun ArrangedRow() {
    Row(
        modifier = Modifier.fillMaxWidth().background(Color.Gray),
        verticalAlignment = Alignment.CenterVertically,
        horizontalArrangement = Arrangement.SpaceEvenly
    ) {
        Text(text = "Row 1", Modifier.background(Color.Red))
        Text(text = "Row 2", Modifier.background(Color.Green))
        Text(text = "Row 3", Modifier.background(Color.Blue))
    }
}

@Composable
fun ArrangedColumn() {
    Column (
        modifier = Modifier.fillMaxWidth().fillMaxHeight().background(Color.LightGray),
        verticalArrangement = Arrangement.SpaceAround,
        horizontalAlignment = Alignment.End)
    {
        Text(text = "Column 1", Modifier.background(Color.Red))
        Text(text = "Column 2", Modifier.background(Color.Green))
        Text(text = "Column 3", Modifier.background(Color.Blue))
    }
}
위 예제의 Preview를 보면, 예상한대로 요소들이 배치되었습니다.
튜토리얼에서 사용된 코드는 GitHub - JetpackCompose-Row-Column에서 확인하실 수 있습니다.
Related Posts
- Android 14 - 사진/동영상 파일, 일부 접근 권한 소개
- Android - adb push, pull로 파일 복사, 다운로드
- Android 14 - 암시적 인텐트 변경사항 및 문제 해결
- Jetpack Compose - Row와 Column
- Android 13, AOSP 오픈소스 다운로드 및 빌드
- Android 13 - 세분화된 미디어 파일 권한
- Android 13에서 Notification 권한 요청, 알림 띄우기
- Android 13에서 'Access blocked: ComponentInfo' 에러 해결
- 에러 해결: android gradle plugin requires java 11 to run. you are currently using java 1.8.
- 안드로이드 - 코루틴과 Retrofit으로 비동기 통신 예제
- 안드로이드 - 코루틴으로 URL 이미지 불러오기
- Android - 진동, Vibrator, VibrationEffect 예제
- Some problems were found with the configuration of task 에러 수정
- Query method parameters should either be a type that can be converted into a database column or a List
- 우분투에서 Android 12 오픈소스 다운로드 및 빌드
- Android - ViewModel을 생성하는 방법
- Android - Transformations.map(), switchMap() 차이점
- Android - Transformations.distinctUntilChanged() 소개
- Android - TabLayout 구현 방법 (+ ViewPager2)
- Android - 휴대폰 전화번호 가져오는 방법
- Android 12 - Splash Screens 알아보기
- Android 12 - Incremental Install (Play as you Download) 소개
- Android - adb 명령어로 bugreport 로그 파일 추출
- Android - adb 명령어로 App 데이터 삭제
- Android - adb 명령어로 앱 비활성화, 활성화
- Android - adb 명령어로 특정 패키지의 PID 찾기
- Android - adb 명령어로 퍼미션 Grant 또는 Revoke
- Android - adb 명령어로 apk 설치, 삭제
- Android - adb 명령어로 특정 패키지의 프로세스 종료
- Android - adb 명령어로 screen capture 저장
- Android - adb 명령어로 System 앱 삭제, 설치
- Android - adb 명령어로 settings value 확인, 변경
- Android 12 - IntentFilter의 exported 명시적 선언
- Android - adb 명령어로 공장초기화(Factory reset)
- Android - adb logcat 명령어로 로그 출력
